
(The Vintage LS Guide is still under construction as I continue to build Sonny. Check back often for updated information and videos!)
I love the power and efficiency of an LS engine but the plastic intake and rats nest of wires have to go! In this Vintage LS Guide, I'm going to show you step-by-step how to get a classic look on your modern LS engine. Don't stress when it comes to wiring, sensors, and hooking it all up..... I got you!

Everyone loves a nice LS engine. It was a goal of mine to do one whenever I bought Francis, my 1963 patina C10. That was my first ever LS build and although I wanted it to be a budget build, a few hiccups along the way gave me the motivation to build a dream engine! Since it was my first swap, I had A LOT of learning to do. I ended up spending way more than I wanted to but I learned about what to buy and what NOT to buy.
Check out the full video series of my first ever LS Swap here.
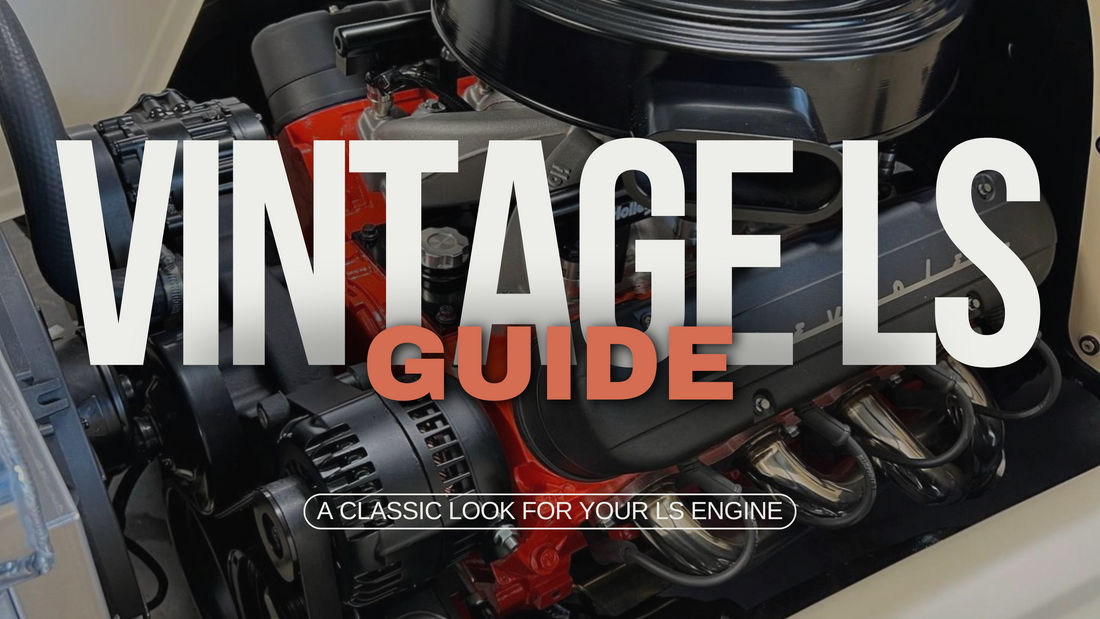
What is a "Vintage LS"?
Vintage LS is a phrase I've adopted to explain the vision behind my LS Swap design. There are alot of different names for this setup but I'm basically trying to strip down the LS, paint the block, organize the wires, install a intake, with a carb style throttle body, and an air cleaner to finish it off. This setup makes the LS look like a vintage style small block. Many people have perfected this setup like Del from Delmo Speed Shop. He has been an inspiration while designing these engine. Many of the parts I plan to use on Sonny's engine are designed and fabricated by Delmo and available on my website.
Vintage LS Parts Overview
1. Intake + Throttle Body Conversion
The first step is converting the stock plastic intake to a single plan intake. When you make this transition, you have to adapt your current throttle body to fit the new intake. There are a few ways to do this depending on if you have a drive by wire or drive by cable intake. If you're drive by wire, and you want a full kit, the Delmo Intake Conversion Kit will provide you with a single plane intake, throttle body adapter, and valve cover adapters. Everything you need to achieve the top end classic look. From there, you just need to add in some small block script valve covers and a dual snorkel intake to finish off the look!
2. Coil Relocation + Valve Covers
Now that you have the intake completed, the next step is relocating the ignition coils that were located on your stock LS valve covers. There are a lot of ways to do this. Some companies make a bracket that mounts on the firewall or frame rail but my favorite setup is the one I'm using on Sonny. The Delmo Coil Relocation Kit uses a new product called the "Del-stributer" that combines all your coils into a cluster to look like a distributor. If you decide not to use the small block valve covers and would prefer to not relocate the coils, you can leave them in the stock position or use some of Holleys valve covers that hide the coils under the cover. I used these on Francis and they look great. My only negative feedback is they are tall and require you to love the engine far forward to have enough firewall clearance. They are also 3x the price of sbc covers.
3. Valley Cover + Steam Ports
1960 Sonny Build | LS Series
5 comments
Which DBC Throttlebody would you recommend with the Vintage LS Setup?
Hello,
I wanted tell you that your video are the best. Not only for explanations but the thought that goes into them .
I just purchased the holley mid mount accessory drive and I want to use a mechanical/engine drive radiator fan. I know holley kit uses the lt1 water pump and it doesn’t have thread or anyway to attach the fan to it.
Do you know of any adaptor or pump to switch out to be able to do this? I just don’t like the electric fans for this application.
Any help will greatly be appreciated.
Mike
408-687-7394
Hey for everyone that’s impatient like I am Barnes and Nobel has the ls-guide book as a digital download!
Hey Jerry! The MAF sensor turns into the IAT sensor and mounts to the bottom of the air cleaner. It will be talked about on part 2 or you can go back and watch my last Francis build when I talk about it. Linked I. The videos above.
Spoke with you about the vintage swap at C10 Nats. Fridy and you explained most of the swap but if I use the OE TB with the adaptor plate where is the mass air flow sensor mounted.